Continents and Oceans of the World

Me on the Map geography project….

I start the geography unit by showing this fun Harlem Globe Trotter movie. HERE at TV411. Some games we do this week in computer lab are HERE at Reach the World and TRAVELPOD. Both are fun geography skill games.

Zach on the map….

This was a major project we did in our class to teach GEOGRAPHY and all the vocabulary of the oceans, continents, countries, states, towns, cities and streets for all of us.  We started by reading the story, “ME ON THE MAP” And I had a list of Geography books too.
Me on the Map

Books that I read include:
Me on the Map by: Joan Sweeny
Our Earth by Anne Rockwell
The Nystrom Nystronaut Atlas for Kids (A great resource for a mapping unit)

I bought a class set of these children’s atlases a few years back….best money I’ve spent! Find them on Amazon
for $3.00 each.  You can get 10 delivered for $30.00 including shipping…. 


We read about 4 pages every day of the atlas as it coincided with our town, city, state discussions. I only have a 1/2 class set as they are rather expensive but I LOVE them and would buy them again.

Hey! Did we make a stopover in Hawaii?  I like that place! 

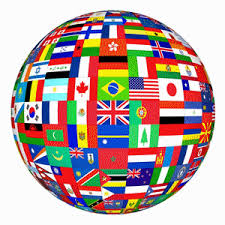
Another link has a flags of the world match card game in color that is really cute and fun. The LINK is HERE at Homeschool Creations. I thought of adding flags to this project but it was already so involved, I’ll save that for another year when I’ve got the basics down and have extra time. A cute map of the world with a word search and continent questions I used is found HERE at tls books.

The Webquest for Geography I will use is at this LINK HERE at Web Mac. This had lots of great info that the kids could check out in the computer lab.

Crossword puzzles I used for each of the continents was HERE at Mac.com. This I used as an extra at another time during the day when we were done with our writing and map booklets.So HERE was the Art/Map project we did.

Finished Me on the Map Projects…

TAGS FOR EACH PAGE HERE.  I found outline political maps at this website HERE at the Teacher Corner. A map of Antarctica I found HERE at factmonster . A few free maps of several continents I found HERE at Superteacher Worksheets. And HERE at Round Valley Schools are some great maps for a unit on the continents and oceans too.

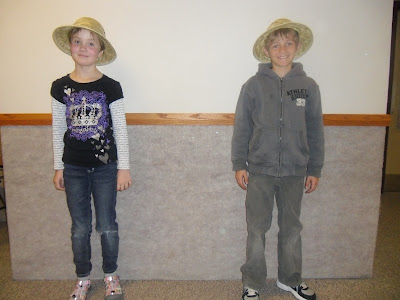
We also wrote about each of the 7 continents in my class as part of our STUDENT TREASURES BOUND BOOKS PROGRAM.  I then took their pictures with safari hats, shrunk them down to 2 x 2 size and had them color pictures of the maps and added their little photog’d selves in their safari hats to the maps. Super cute.  I’ll post that project when it comes back from the publishers.

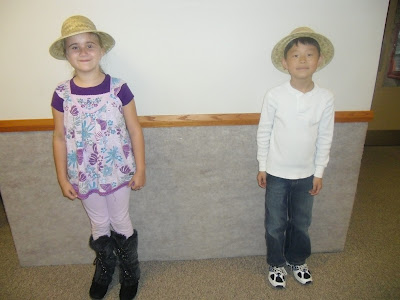
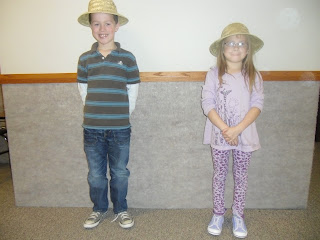
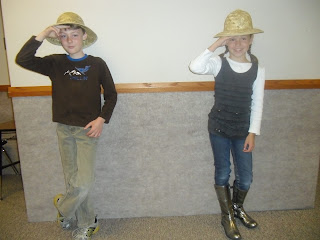
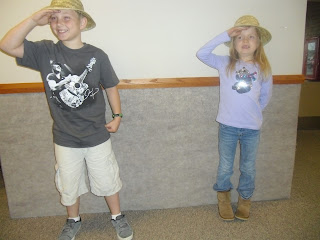
Posing in our safari hats….

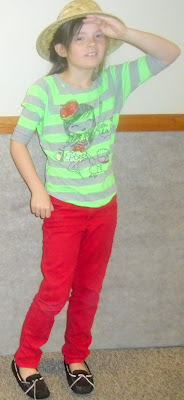
Do they LOOK excited to be traveling around the world? hmmmm….

Did you guys like traveling on the Orient Express across Asia?  

Where in the world is…..Matt and Saige? 

I think they got stuck on a submarine in Antarctica….that’s what I heard….

Did you girls have fun in the Amazon? Or did you like the Sahara desert better? 

That helicopter ride over the Mediterranean? Yeah that was pretty cool! 

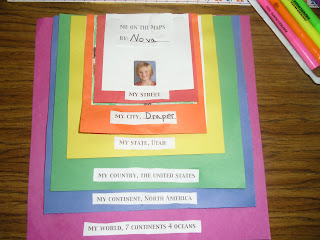
1. First we did a 4 inch white square with “ME ON MY STREET” and had our street names and addresses if we knew them. We drew a black street with yellow lines on it and our house with our dog a tree and a picture of us next to our house. Then we colored it and then backed it with a 5 inch RED SQUARE for color.

Me on My Street….
We tried to add house numbers….some kids had just moved and didn’t know them yet…
But I think that is important to learn their street number and name….

2. Second we did a 5 inch white square with “ME IN MY CITY of SALT LAKE” and did a picture of
a criss cross black street with yellow lines. Then on either side of the criss cross street we made buildings and listed our favorite restaurants, stores, movies, pet shops, police station and fire station. Then we colored them different colors and put ourselves near our favorite place to go in our city. Some kids had skate shops and libraries. We backed it with a 6 1/2 inch ORANGE SQUARE.

Then we did cityscapes of our favorite stores in our city….

McDonalds and Walmart were big time favorites…


I have floor puzzles I bring out this week for a geography center. Kids love these giant floor puzzles and I always hear lots of discussion because this one has pictures of what things are found on that continent or state.

The kids will remember cities….where we shop, eat and play….
Yup, gotta love the golden arches of McDonalds…favorite places in our city!  

3. Third we made a 6 inch white square with “ME IN MY STATE of UTAH” and did a picture outline of the State of Utah with the Great Salt Lake, Lake Powell, and a star with our capital city of Salt Lake.
Then we colored that in and had us standing next to the state in cowboy hats or baseball hats. We backed it with a 8 inch YELLOW SQUARE.

Lucky for us our state of Utah is very easy to draw! 
We added the Great Salt Lake, the capital (Salt Lake City) Lake Powell and the Colorado River….

We all thought Lake Powell was soooooo important….snicker….Love that place!  


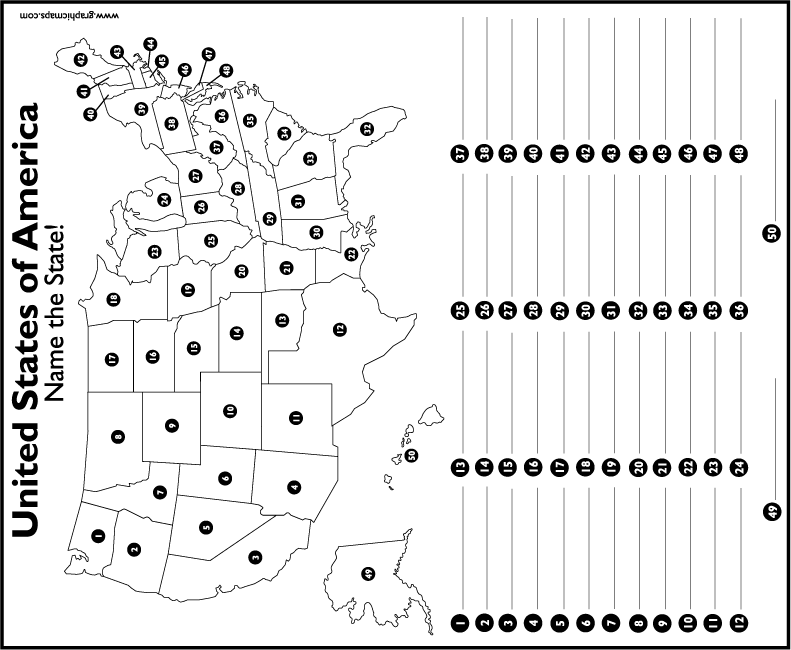
4. Fourth we made a 8 1/2 inch white square with “ME IN MY COUNTRY, U.S.A.” and I copied a blackline and shrunk it of a U.S.A. Map. We backed it with a 9 1/2 inch GREEN SQUARE. HERE is a U.S. Map Blackline for Free.  It has a number for all the states and then a line underneath to write the names of the states. It is a fun activity for kids to help each other in cooperative groups to fill in all 50 of the United States.  We will be using this one in my class. THIS IS THE MAP WE USED. I shrunk it down 10 %.

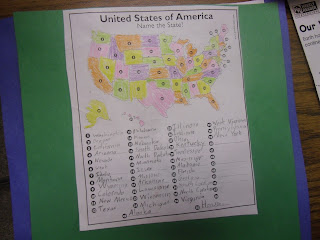
Our country the good old U.S.A.   We listed all the states we could….

This was a very fun activity….

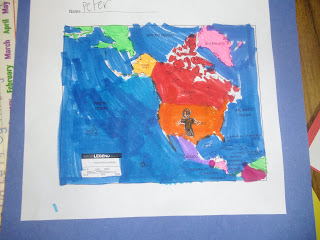
5. Fifth we made a 9 inch white square with “ME ON MY CONTINENT, NORTH AMERICA” with a map of North America and we colored in the different countries; Mexico, Canada, USA and Greenland all different colors.  We backed it with an 11 inch BLUE SQUARE.

Our continent….North America….
We glued everything with a border around 3 sides, but flush with the top…no border….

Me on My Continent…we listed Me on My…on every page we did….


6. Sixth, and lastly, we made an 10 1/2 inch white square with “ME IN MY WORLD, THE PLANET EARTH”and I copied and shrunk a blackline of the world’s continents. We colored them 7 different colors and the water blue and had the oceans labeled. We backed it with a 12 inch PURPLE SQUARE.  This link is a great one for copying simple maps of the countries of each continent. HERE at eduplace is the link.

Me in My World….The Planet Earth….
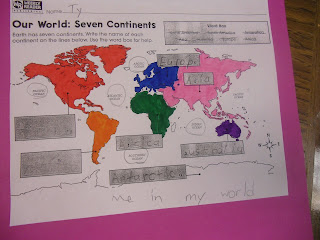
I did 2 styles of these…one for the rotation on the bottom includes a word bank. The top one they
have to come up with the continents AND oceans on their own with just a beginning letter….One was more challenging than the other.  One was for my test to see if my kids learned all 7 continents and all 4 oceans. 

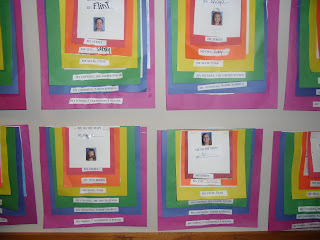
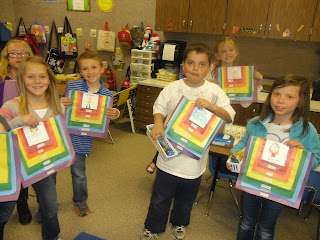
Then we stapled them all together….Finished Mapping Activity – Continents, Countries, Cities and  States….
You’ll notice there is no border on the top of each page….we kept that flush so the colorful parts would not
get obstructed by white papers from each section…..I think that looks nicer….

 Me on the Map Geography Activity….What do you think? I think the kids learned a lot about their world….

And I did a LOT of paper cutting…..snicker…..
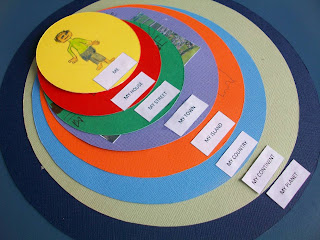
Here was my inspiration…a project I saw on Pinterest…..Here is one on 365 Day of Pinterest Creations 

The reason I did squares instead of circles or ovals like others did was simply because it would be easier to cut on a paper cutter and measure and I did it for a 2nd grade rotation so I had 100 kids to do it with. I’d go absolutely crazy cutting out that many circles….EEK!

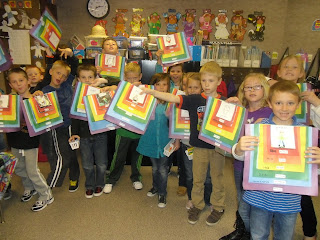
Here was my rotation class with their finished map project….Me on the Map! 

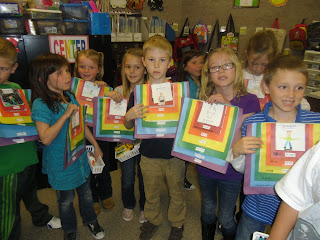
I think they were very proud of their work….
I hope they learned more than just “NEVER EAT SOGGY WAFFLES…NORTH, SOUTH , EAST, WEST”…..
I updated the captions to include the names of the states, continents and country we live in…so kids
would always remember them and not get mixed up on the vocabulary.

 I think it turned out just as nice. And very colorful with the rainbow order of papers.  What do you think?

Puppet Theaters from a Cereal Box

I saw this artist’s cute renditions of kids drawings on “How to Be a Pirate” or “How to Be a Fairy. I thought that sounded so fun for kids.  I wanted them to do some writing on something other than reports and non-fiction and narrative stories since we’d done plenty of each during our writing block.

So We first looked at Helen Doodles drawings HERE. I liked how her drawings had lots of fabulous writing hints on them too. For How To Be a Pirate she had listed pirate lingo like “Walk the Plank and Shiver Me Timbers” and stuff like that….GREAT tips for kids to jumpstart their own brainstorming.

Product Details
Then this book was another inspiration. Kids love superheros! 

So how about a “How To Do It” instructional writing? That would be fun with a kid’s imagination tied into it! It also teaches kids another “AUTHOR’S PURPOSE FOR WRITING….TO INFORM, ENTERTAIN, PERSUADE”. This will definitely fit into the first 2 purposes for these authors to write!

Product Details
Another Inspiration were the series of books called “How to Train Your Dragon”….These are very popular in my class too….

The pictures of hers reminded me of “No David” books. I showed the kids how funny the illustrations are. These would make good puppet faces!  Then we brainstormed all the “How To” titles we could come up with. Each student had to choose one of the categories.  They did well brainstorming…..
1. How to Be a Pirate
2. How to Be a Fairy.
3. How to Fight a Dragon.
4. How to Play the game of _______.
5. How to Build a ________.
6. How to Make a ________.

Some kids wrote serious How To instructions. Some did funny mythical fictional ones. We started with a rough draft “sloppy copy”. It seemed like everyone had a great idea.  Then I edited them and had kids add sentences, better describing words, more enhanced “settings” for their how to’s.

I think this one was “How to Catch a Dragon”

After rewriting our stories on nice paper, we all collected cereal boxes. Then we did a “front of the box” 1/2 sheet illustration on white paper of our most important point in the how to writing.  Then we cut a top square out of the front of the box and a bottom square out of the back of the box for puppetry.

Making a puppet theater from a cereal box 

I used a steak knife and cut across the middle of the front…then used scissors to cut up both sides. Then I folded
up the top and taped it to the top of the cereal box with book tape. This is where their title went. 

Then on the back about the bottom third I used my steak knife again and cut a slit. Then used scissors to cut down the sides and across the bottom leaving about an inch around the edge. I wanted them to be able to lay their puppets insde
and they wouldn’t fall out.  

Here’s the top folded up and ready for the red or yellow paper we glued on with the caption
and the cute little foam ditty I found at Hobby Lobby for a buck. 

We decorated the bent up top portion of the box with a curtain and a sign made out of foam. I had found them on a clearance rack in the summer for $1.00 and there were 30. WHAT A DEAL!! They had some religious slogan I covered with the rectangle of white paper.

Cereal Box Puppet Theater… “How to Spot an Alien” (this one was soooo hysterical!  “use twinkies to  lure  the alien…”
Here is the finished cereal box theater…red paper at the top and a half sheet of white illustration paper covers the bottom. The sides just stayed looking like cereal.  We used the other half sheet for puppets and I gave each student 2 mini popsicle sticks or straws or wooden skewers to use for puppets.  I kinda cleaned out my supplies…. 
Here is a finished writing after the edit and rewrite were done…..I wish I had  snapped more pics! 
They were very motivated to do their theaters so everybody got their rewrites done before
working on their puppets….I find that an art project really motivates kids to get a writing done quick.
The kids got to choose their own stationery from my collection….some chose  some cute dragon  paper…

How to be a Professional Skier…..Such great illustrations too! 
I loved this “Jump” illustration…so cute! 

 It is cute how they included a glittery star that says “starring”.  I told them to write their names under their stars.  So cute, right?

Cute paper for the raspberry ice cream How To….
How to Be a Princess…..so cute…Did you know you MUST be KIND?  I loved that….

Then we started our puppets. Then we each were allowed two long, wooden skewers to tape onto 2 puppets we made from the other 1/2 sheet of our white paper. They had to have everything finished in 4 hour-long writing periods this week. Try editing 30 papers in an hour. That is not so fun.

Reading the How To Be….with friends at the microphone….

Then the author read their “How To Be a” and got help from friends in the puppeteering department…

It was fun to hear all the unique How To writings the kids came up with…

I wish I could show all of them. . There was such a huge variety!

How to be a Pirate was popular….This was such a great illustrator too!  I think  How to Spot an Alien was also popular…

There were quite a few that were very instructional…..How to Make Ice Cream and  How to
Potty Train your Pets were both very interesting, and informative! 

 So first day writing, next day rewrite and illustration page. 3rd day box and puppets, 4th day finishing day. The last day we entertained each other.  We got in groups of 4 and did the puppet shows for each other. It was so fun to watch them read with expression for each other.

We practiced  first with a partner….

They got to choose 3 friends to match up with for 3 swaps…You read to me, then I’ll read to you….

I think the kids really got into this fun buddy reading activity the most….

But they were also proud of their puppets and their theaters….Nova did How to Be a Princess…
I loved that she included the fact that you MUST be very NICE and KIND.  Good advice all you “would be” princesses! 

These Puppets were my very favorites….There were quite a few kids who did How To Train Pets….so cute…

This was a lot of fun and surprisingly not as much work as you would think!  

 Here are our finished puppet theatres, and our finished “How To” writings, and our puppets. This was a fun and creative enrichment project.  I loved how they all turned out and how engaged the kids were throughout the week.

A Person I Treasure

Here’s a little person I treasure…my granddaughter Meg…such a sweetie to me…

I love to get kids to write about people in their lives. They always have something really special to say. Our March “A Person I Treasure” writings to go along with our rainbows and “pots of gold” art are something I came up with when I found this cute “treasure chest” stationery.  

Lots of kids wrote about a brother or a sister…

And then I thought about adding lots of sequins and jewels to the chest for an art experience to decorate the treasure chest. It seems like when I add a simple art experience for motivation to finish a writing project I get a lot better results. Even if kids are not excited about writing are motivated to get to the fun part afterwards.

I know a lot of the kids really LOVED their pets and wrote about pets…

  I had 12 extra kids in my morning writing class so it took a while to edit 30 kids’ writing but we got ‘er done! Ye Hah! Here are their darling thoughts…..many about cherished pets.

And I think the majority of kids wrote about their moms….

Gotta love a good cat! 

This cracked me up….I love my mom because she’s not very strict….darling! 

And who wouldn’t treasure a “hysterical best friend?”  I would! 

Some wrote about friends in the class too…isn’t that sweet? 

Ty wrote about his dad….I loved reading that too….really special! 

We did a sloppy copy first, then a teacher edit…then rewrote on nice paper…

They had to do a picture of themselves, and the person they treasured….

Then they had to decorate the treasure chest….don’t ya love this rainbow chest?
Maybe a future design star in the making….
Here some more peeps that I treasure….my hubs and my youngest granddaughter Josie…so cute! 
What can I say? I’m a doting grandma! 

Measurement Centers

 We had some fun measurement centers this week as well as making a Measurement Man….pictured here

  A game I purchased that is called How Tall Am I is a fun measurement activity. HERE WAS CENTER 1- LENGTH MEASUREMENT USING INCHES.

It’s a fun inch measuring game called “How Tall Am I?”  Lots of fun mis-matching layers of fun people to get a total “height” in inches….
How Tall Am I Game
They used inch and centimeter rulers to measure the totem poles of  wacky people they made….It’s a fun measurement game my kids love to play on rainy days. 

 HERE WAS CENTER 2 – WEIGHT MEASUREMENT

These girls are measuring weight using our class scale. They chose a classroom item to weigh in “bears” or “cubes” This is another type of non-standard measurement they worked on.  Each had to write up their measurement on their Envision Math estimation data worksheet. 
I also have some “gram” measurement weights that kids could use the next time we do measurement centers.

 CENTER 3 – VOLUME MEASUREMENT

I had cylinders to show volume and the kids added “cups” to the cylinder to get used to the terms volume and cups. And that  2 cups make a pint. 
I borrowed a gallon, quart, pint and cup measuring set from my coworker down the hall who purchased one a few years back.  Here the kids are doing some estimation pages on cups and pints. 
A set similar to this was set out at a center all week too. Nobody paid much attention to it, but I was NOT going to add water or anything crazy like that. I’m sure it would have made it more popular though….hehe…

 THIS WAS CENTER 4 –  INCH AND CENTIMETER MEASUREMENT

I think you can find these worms and the cards below at any teacher supply store. 
Here are the game cards that go with the measurement worms. As you can see I have 3 kinds of worms to measure. Some are linking inch cubes, some are linking “inchworms” and some are different lengths of rubber worms. The cards were kinda easy for my class….but they still liked measuring the worms…..
 I combine worms to use rulers to measure in inches and centimeters.. I also bought a class set of measuring worm cards for kids to follow the directions and measure items on the cards.   

 CENTER 5 –  FEET AND YARDS MEASUREMENT

The last center was to work as partners with my class set of measuring tapes. The assignment was to measure 5 big things in the classroom using feet, inches and yards and write the totals down to compare with the whole class later.

Then for art this week we made a Capacity Man we called “Gallon Guy” or “Gallon Girl” and we used heads that were uniquely decorated like ROBOTS. THIS WAS TO LEARN CAPACITY/VOLUME OR LIQUID MEASUREMENT.

Capacity Man, or Gallon Guy….lots of fun! 

Gallon Guy is Great for teaching volume in cups, pints, quarts and gallons or if you want a great enrichment activity! 

The kids learned how to tell me how many cups, pints, and quarts were in a gallon.  Here was a sample I used.  Her FREE LINK is HERE. It is by Amber Polk. It is really cute. HERE  is a link to  pictures  of our Gallon Guys. They turned out pretty cool.

But not quite as “COOL” as these guys….all dressed up for 80s Days yesterday! 
Do the 80s remind you of the 50s? You should have seen the Fonzi type hair and
rolled up pants….too cute! 

Gallon Guy, Measurement Man

Gallon Guy Art Project

Gallon Guy is a kind of Capacity Man.  It will help teach the different types and vocabulary for liquid
measurements. This is the one I have in my classroom. It is rather busy though. I would much have preferred a simpler version like Gallon Guy below.  Measurement is limited in our core, but since this is a gifted class of kids, I thought I would add capacity for enrichment, and also it is in our envision math section 14.

I do like this Monster Math Guy a lot better.  He has all types of liquid capacity terms and you could have the kids copy him but make their own “monster” art project just using the cups and pints and gallons in correct sizes but choose their colors and make their own monster face.  You could call it your measurement monsters.

I found this cute pic at Squidoo HERE. It looks fun and easy.

We learned that 4 quarts = 1 gallon, 2 pints = 1 quart, 8 pints = 1 gallon, 4 cups = 1 quart, 16 cups = 1 gallon, etc.

.  This gives you the idea how to structure your own Capacity Man.  I’m going to use similar sizes and colors to this guy to make for my classroom.

A nice blackline master of all the shapes can be found HERE at Education World.

OR….instead of monsters we could do Robot faces instead of the boring, white, paper plate. That would be fun!  

robot kids craft
HERE at No Time For Flashcards I found this cute robot we could use as an idea of where to start on
our “Gallon Guy”. The kids could design their own robot faces for their gallon guy “robot” instead of the paper plate which looks kinda plain.  Let’s be creative with our gallon guy!  Plus we can get rid of some of our paper scraps in the process! 


You’ll need 5 sheets of construction paper, each one a different color.  One will be for his head (or her head, as the girls always  want to make a Gallon Girl), one will be kept whole and labeled “gallon”.  The next sheet will be folded into fourts, cut, and labeled “quart”.  Then, fold another sheet into eighths, cut, and label “pint”.  Finally, fold the last sheet into sixteenths, cut, and lable “cup”.  My kids had a ball making these, and stayed focused the entire time.  When trouble comes your way (in math), call for Gallon Man to save the day! (directions are from S is for Second Grade). 
This cute rendition of Gallon Guy or Gallon Girl is from Coon Dogs. 
The cutest one I found online was this one….It’s from HERE is a free download from Amber Polk at Adventures of a 3rd Grade Teacher.  It is really cute. It’s a Gallon Man with the body of a Superhero! That would be so fun for my kids too.  She has a download for the quart, pin, cup face and chest area.  I’m thinking I’ll still do the robot head.  Even though superhero is also a cute idea.

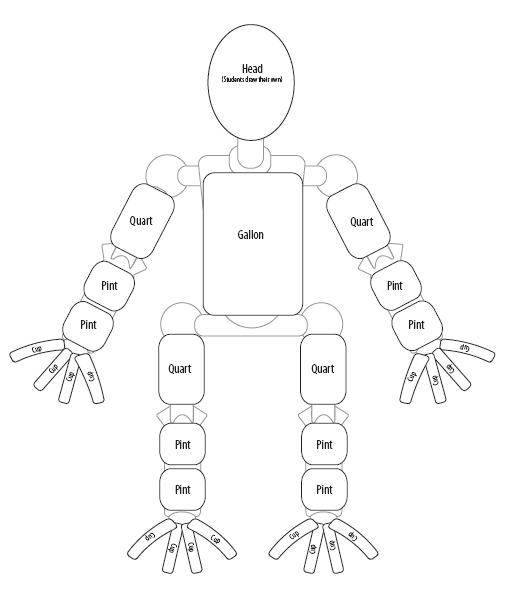
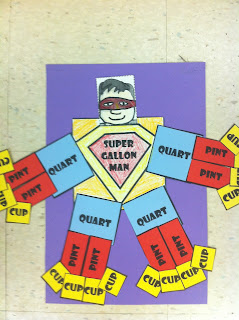
  2 cups is a pint. 2 pints is a quart, 4 quarts is a gallon. 4 cups is a quart, 2 quarts is 1/2 a gallon. Kids can learn and memorize these volumes with their Gallon Guy.

So HERE are OUR Capacity Robots.  The kids named them everything from Gallon Guy and Gallon Girl to
Gallon Bot 3000. They all turned out looking quite cute.  I like the superhero idea too but I thought my little guys would do a better job making a creative robot face with scraps of recycled construction paper.

Here was my sample and our class brainstorm for names for the Gallon  Robots. They each named their own guy. 
Teaching Volume and Capacity through this art project was great!  
Capacity Man, Gallon Man, Gallon Guy…it’s all the same…..
Some added necks and buttons to their Gallon Guy Robots too….
This one had 3D parts on the face…Love the Billy Bob “Bot”  hehe…

Yes this gallonator looks like a Gladiator, doesn’t it?  
Gallon Girl …but she’s having a bad hair day…..:
Gallon Girls and Guys – All the kids really understood capacity measurement after this activity….
SUPER gladiator!  Eek! He’s a little scary looking! 

We did 5 measurement centers to go along with our math unit in measurement this week. HERE is the link to our measurement centers.

Hope you enjoyed our Measurement Men!  

The kids learned how to tell me how many cups, pints, and quarts were in a gallon.    Her FREE LINK is HERE. It is by Amber Polk. It is really cute weather you go the superhero route or the robot route, both are great learning tools. And our robots turned out really fun!

St. Patricks Day Leprechauns and Writing

Leprechauns, pots of gold and making some wishes too….

Then we wrote Leprechaun similes…they are a type of metaphor.  A Leprechaun is as _____ as a _____. If I caught one I would_____ and my 3 wishes would be_______.  They turned out cute. Here are some that are finished.

The kids told what they’d do on St. Patrick’s Day if
we caught a Leprechaun….

Hopefully we WILL catch some with our cool Leprechaun TRAPS!  

Then we wrote what 3 wishes we would make…..they are pretty cute….

What would YOU wish for?

There were time machines, Disney Cruises, and piles of money of course….

And lots of kids would buy a new house for their parents…that’s very sweet! 

Of course some were clever and wished for MORE than 3 wishes….

We shared about 5 or 6 so far with the whole class at the Author’s Chair….

And our glittery Leprechauns are so cute….look at those orange beards! 

Kids are very creative writers…..

I loved reading all about their 3 wishes….

St. Patricks’ Day is right around the corner….I hope we catch a little green guy.

Fun St. Patrick’s Day Song we sing (Tune Jimmy Crack Corn) 

IT’S ST. PATRICK’S DAY AND WE’LL HAVE A LOT OF FUN
SINGING AND DANCING UNTIL THE DAY IS DONE
LOOK AT A LEPRECHAUN, WHAT DO YOU SEE?
LEPRECHAUN, LEPRECHAUN, DANCE FOR ME!

You KNOW those little guys are VERY TRICKY!
  
St. Patrick’s Day art project…..
The Leprechaun we made from butcher paper and construction paper in green, black, peach, yellow and orange, 1 x 7 inch strips for the beard. Then I glittered the yellow buckle after they drew a black marker square inside of it. We used wiggly eyes on top of Walmart dot stickers in green.  The hair is some crimped wrapping paper filler in the paper aisle of Roberts or Michaels gift wrap and bag section. Sometimes orange is hard to find so look early.
  
For writing this week we are finishing doing a narrative piece on “A Person I Treasure…”I love reading about whom they love in their lives.  It is a special piece we keep in their writing portfolios.  They will be a special treat to bring home at the end of the year.
RAINBOW CAKE….it had 6 layers of color inside too!
Here’s a rainbow birthday cake my daughter made. My kids would 
love THIS SKITTLES CAKE! 

 
Here is a copy of the letter I send home for the Leprechaun Traps.  Everybody participated. Check them out HERE
Another fun set of activities can be found at What the Teacher Wants HERE.
I made up these cute Irish Bingo games using terms you might hear around St. Patrick’s Day. It is a fun reading activity for the kids and I found these sparkly stickers in a shamrock shape to make them even more appealing.  Then I had them laminated so we can use them every year.  
MATH BINGO
A fun “Lucky” Bingo game I found was at the dltk WEBSITE HERE!   I also found some cute art ideas on another Teachers First website. The link is HERE.  It’s Irish “word bingo”. The kids can do this one at a center.
zzz100schart

On the back is a math Mystery Picture 100s chart. I would say, 6 tens and 3 ones for them to figure out the number. Sometimes I would say it backwards 2 ones and 7 tens. Or I would add ten to a number or subtract 10 from  a number and they had to figure it out and mark it in green marker.  Try to make it into a 4 leaf clover as you color in the numbers in green. A cute 100s chart can be downloaded free HERE at Firstgrade Parade.  I will post some more stuff we did in a few days. 
Happy St. Patrick’s Day! 

St. Patrick’s Day Leprechaun Traps

We are playing this fun game in P.E. this week. It’s like 4 corners only there are 6 charms! Similar
icons are put around the room in 6 areas.  Kids choose and area, I roll the dice, and the kids in the one landing on top
are OUT!  We keep rolling till we have one winner who gets a little gummy bear treat. 

 We are also working on making Leprechauns, and pots of gold, and writing about a Person We Treasure.

They go nicely with our beautiful rainbow pots of gold.  They are made from 1 x 12 inch strips of red, orange, yellow, green blue and purple paper then glued to a black pot. We added a clip art picture of gold pieces to the top.

Then we wrote Leprechaun similes…they are a type of metaphor.  A Leprechaun is as _____ as a _____. If I caught one I would_____ and my 3 wishes would be_______.  They turned out cute.  I’ll post some of them soon.

Here’s the letter I sent home for the Leprechaun Trap inventions assignment….

For St. Patrick’s Day we made some Leprechaun Trap!!. I hope some of these can catch a leprechaun for one of the kids!

This was a cool obstacle course the little guy would travel through before getting trapped in the box. 

I loved this one so much. A lot of time went into painting pictures for the walls
of this “All You Can Eat Buffet!” 

Wouldn’t you love to go to a Leprechaun buffet? Yeah….me too!  There
were flashing green lights inside as well as lovely tables and chairs to sit and dine! 

HERE at One Charming Party is a cute candy bag topper for St. Patrick’s Day. It’s cute so go check it out.

Cute and glittery tube trap….walk up the ladder, slide down into the tube….gotcha! 

Do you think he’ll trap one in the big, green, bag? I hope so! 

This one looked similar to a mailbox. Super cute! Loved the scary signs too. 

Here was another one that lit up with lights….so glittery and cool, but  you KNOW those
leprechauns aren’t going to obey the signs posted, are they? 

HERE at Family Fun  is a cute St. Patrick’s Day Treasure Hunt printable. It has a rhyme for the first clue to go look under your bed. I think I might try this for my grandkids to do next time they come over. It sounds really fun.

This one had some real Lucky Charms cereal added to the black pot….lots of enticing stickers too….very cute! 

Loved the artistic rainbow and the Lucky Charms guy too! 

In this Labyrinth of tape one might get caught…..mmmhmmm……

Or this Disneyland playland for Leprechauns! Look at all the holes he might fall through! 

Loved the name on the fun house…..Rainbow Palace….so cute! 

We decided to have lots of signs that said the opposite of what we wanted….because we all
know that sneaky leprechauns don’t follow signs or rules, do they? 

Loved the wooden ladder and how that tiny guy will just slide right down into a TRAP!
Good Work!  
Just because it is tiny, doesn’t mean it can’t trap a Leprechaun! 

We loved the shamrocks made of pipe cleaners on this one, and the creative ladder. This one
also had some Lucky Charms Cereal to entice a little green man to come fall inside! 

Climb on up, slide right down.  Don’t pay attention to the Do Not Enter sign! 

This was a real mousetrap! Climb up, crawl through the tunnel, then , OOPS! Trapped in the tube! 

You can’t even see it but there is a secret hole under all that green grass on top, good job! 

Pretty rainbow slide and lots of cute stickers too, not to mention the advertising of GOLD! 
This was a pretty silvery trap with a black pot of gold on top! 

Do you think the pot or the green carnation will trip him up?  I wonder…..

This cute girl did a Leprechaun dollhouse, complete with bed, table and chairs. She’s gonna
keep him for awhile to decide on 3 perfect wishes……
We had a great time inventing traps for Leprechauns for St. Patrick’s Day! Wish us luck, or for a bunch of lucky 3 wishes….or……well….. something like that.  Anyways, have a Happy St. Patrick’s Day! 

Dr. Seuss Day Activities

Click to play this Smilebox slideshow
Create your own slideshow - Powered by Smilebox
Slideshow generated with Smilebox

HAPPY DR. SEUSS DAY!! What’s YOUR favorite Dr. Seuss Book? 
So…..today we had so much fun celebrating Dr. Seuss Day.
Our PTA showed a Dr. Seuss movie and gave out cake and popcorn for the kids in the gym.

In school we voted to find out which is our Favorite Dr. Seuss Book.  We did a CLASS GRAPH!  Then we had a book exchange and a Read-a-Thon in our Pajamas and with pillows and blankets!

I found 5 writing topics to choose from for the week. Here are the choices…..taken from the blog….Minds in Bloom. They actually had 20 ideas but we are choosing only 5 for our journal writing on Thursday…..

  1. Make a list of things you could do to cheer up the Grinch.
  2. The Cat in the Hat is lending you Thing 1 and Thing 2 for the day. What will you do with them?
  3. Pretend that you get to choose one Dr. Seuss book that will be translated into every language and given to every single child on the planet. Which book do you choose? Why?
  4. Create a new animal for If I Ran the Zoo. Describe your animal in detail, give it a name, and illustrate it.
  5. Choose a Dr. Seuss character and pretend that you will spend the day together. Create a schedule for the day.
We made in art some woven and colorful fish from the rolls of butcher paper in the school. We had 1 inch strips of paper and we cut strips in our giant 1 foot fish.  We are learning about measurement so that’s why we did 1 foot fish with 1 inch strips to weave in and out. The cute caption reads “One Fish Two Fish, Red Fish, Blue Fish. 
Dr. Seuss Day Activities in the Gym were fun! 
We did this fun activity; guess how many swedish fish are in the jar of candy! 
Here’s our One Fish, Two Fish, Red Fish, Blue Fish….
Another idea on Pinterest was to add red fish (or swedish fish) to blue jello in clear cups
that read “One fish, two fish, red, fish blue fish”.  Cute idea for next year! 
A fun handprint card made into Thing 1 and Thing 2 that I thought we could try for art this week.  It looks like a ton of work but I know the kids will like it and they can do it and maybe make up a poem about their Thing 1 or Thing 2 getting into some trouble on Dr. Seuss Day!  
Thing 1 and 2 are waiting for some faces!  Great fun on Dr. Seuss Day! 

Here is a finished “Thing 1 handprint” 


Making woven fish a few days ago…..

HOW TO MAKE FISH:
Cut out whatever fish shapes you like in multi colors. Cut strips going from top to bottom of fish about 1 1/2 inches apart North to South. Then cut 1 inch strips of colored paper the lenth of your fish. Then weave them in starting with red, then orange, yellow, green, blue, purple (rainbow order).  Then glue down the ends of the strips onto the fish so they will stay (both in front and in back).

Then we had a competition to make the most “at” words on the backs of our woven fish.  Very fun, speedy writing activity.

We loved all the Dr. Seuss activities this week!

Some kids did their own color order of the strips and didn’t go in rainbow order. It’s all good though!

Here’s our cute Cat in the Hat bulletin board with our woven ONE FISH TWO FISH, RED FISH BLUE FISH. 


We also did a fun Crossword Puzzle and Wordsearch “fill in the blank Book Titles” Dr. Seuss Wrote.  And we had a book exchange at school. Kids brought their old but in good shape books to trade and some exchanged up to 15 books. They all acted like it was Christmas morning around here!  

Favorite Books by Dr. Seuss Graph….I was not surprised that 3 of Dr. Seuss’ books tied for the win. 
I can’t believe he wrote 44 books for kids, can you? What was YOUR favorite? 


Today we had a Read-A-Thon in our Pajamas in honor of Dr. Seuss’s birthday on March 2nd. 
Our school is putting on a movie after school with popcorn and Dr. Seuss green cake too. 
It’s fun to read in your jammies!    

Two thumbs up for green eggs and ham! 

In our Pajamas! The whole school wore pajamas! Even the teachers! 


Eating Green Eggs and Ham! 


It sure was a very fun day today on Dr. Seuss Day!